
Hey there!
Okay, riddle me this:
what can be found in every thrift shop, but is never bought by anyone..?
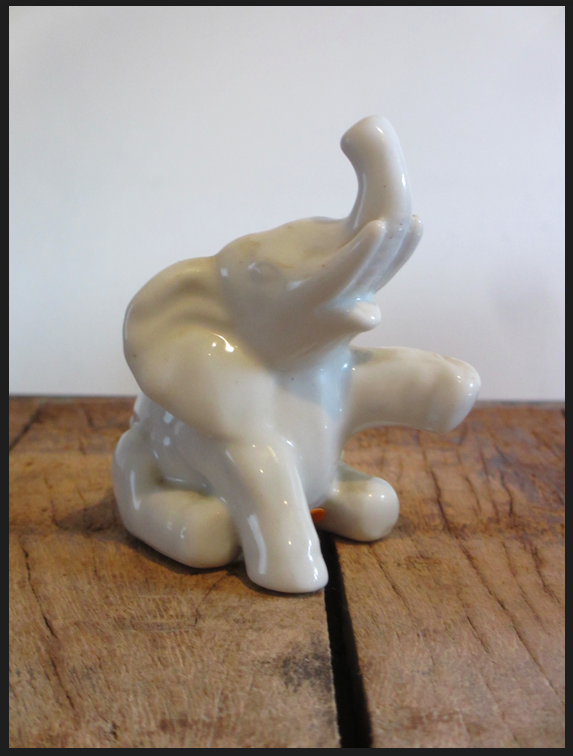 |
| "That will be me! *sniff*" |
aaawwwwhhhh... poor little porcelain elephant! Indeed, nobody ever buys you!! (hey, I didn't say it was a funny riddle ;) )
I've been thrifting for quite some years now, but I have never encountered a thrift shop where those little porcelain figurines didn't thrive in abundance. They just... flourish.. And no one ever buys them, because... well, why would you, they're not exactly fun or handy or beautiful, are they?
So, I suspect that the cashiers just hold monthly secret squash-tournaments at night where they smash the majority of those things into pieces just to make sure that the whole store doesn't overflow with them...
But if you've been following this blog a bit you know that I have a major weak spot for ugly, useless objects, so as you've might have guessed; I bought a bunch of them. Or to be more precise: I actually got them for free since the cashier could see my point that nobody would buy them anyway (a perk of being a frequent customer)
So, I came home with this:
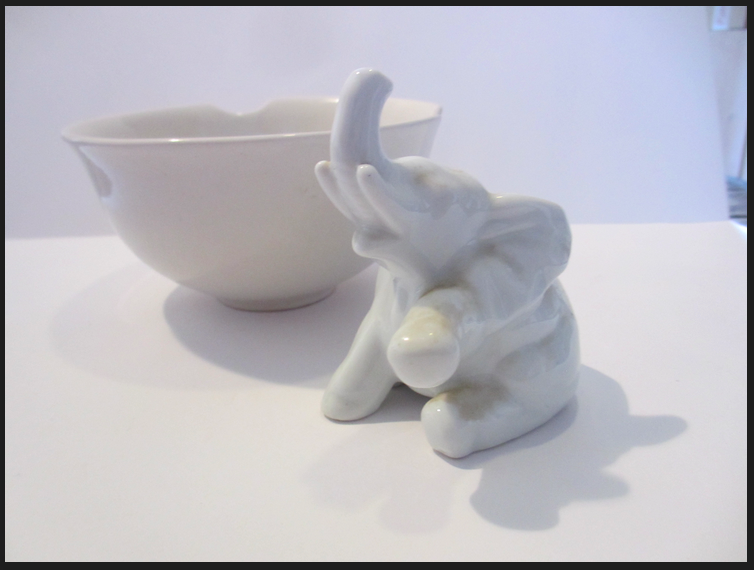 |
| "take me with you, please!" |
I thought it would be really cool to make cups and bowls with animals in them, as I had once seen in a designer magazine for A LOT of money. But of course, I wanted to be able to actually use the cups. And -as has been my experience so far- with this tutorial that is possible!
Here's what I used:

- a porcelain figurine
- a bowl/cup/plate where the figurine fits in without wobbling (the bottom of the figurine should fit in the bottom of the bowl flatly, without showing any gaps between bowl and figurine)
- dishwashing liquid or something alike
- a silicone sealant with holder
- sanding paper
- something to give it an extra cleanse with, I used rubbing alcohol.
and of course, I forgot to photograph the most important supply ( but it deserves its own picture)
this glue!

Olba kit! I've used super glue in the past for when glueing porcelain, but since that doesn't allow any movement, it will eventually let loose again. This one looks a bit like silicone sealant and allows movement and is thus a much better option when you would like to wash and use it. I'm a big fan of it! ( don't worry; they don't sponsor me... yet..... ;) )
There might be similar brands like this one for sale, I don't really know. And if you really would like to give it a try without buying glue like this one, well, you can always try it with super glue and just be a little more careful with it and/or accept that you have to re-glue it every once in a while.
What I did:
 |
bath time!! |

( I did the next steps in the wrong order myself, and had to do an extra round of cleaning and sanding, so I recommend to follow the order of this tutorial! :) )
As you can see in the picture, the bottom of the elephant is hollow. Now of course, we're going to try to glue veeeeerrry careful so that there won't be any liquid seeping between elephant and bowl, but still...
Can you imagine what would happen if some coffee would manage it's way into the hollow part and stayed there, since you can't reach it? you'd probably be able to harvest mushrooms after a while, Yuck!!
So, I decided to fill the elephant with silicone sealant; a leftover from when I updated our shower.
 |
| ehrmm... |
So, I stuck the silicone gun up the elephant's arse (well there's a sentence I never thought I would write...) and filled it with it with the silicone, to completely fill the hole and prevent liquid from getting in.
Okay, glueing the poor elephant's butt shut is a bit a weird ;) but it's a necessary step, I promise!
Try to prevent spilling any silicone on the outside of the elephant and bottom surface, as I'm not sure how that would affect the glue.
 |
| poor thing! :( |
 |
| I smoothened the surface with my wet finger. |
I let the silicone dry overnight.
The next day, I sanded the surface where the glue would be, to get rid of last pieces of dirt/silicone and prepare the surface for the glue.
 |
| so, I should have done that after adding the silicone.. |
 |
| and cleaned it with some rubbing alcohol |
I couldn't make any pictures of the last step, as I didn't have any olba glue at hand myself, and had to wait until I paid my parents a visit.
But well; it's really simple: follow the instructions of the glue you use, make sure to cover the entire bottom surface of the elephant and place it in the bowl.
It's really important to place it well, so that no air/liquid can get in between.
Olba takes quite a while to dry.
And we're finished! It may look like quite a lot, but apart from the drying part, it goes quite quick and is quite easy. If your hesitant because you don't have the materials at hand: these are just the things that worked for me; other options might be possible as well. Just use your common sense and experiment!
and here's also the other ones that I made earlier: animals coffee cups!

just in case you were wondering: as far as I could find, you don't have to be afraid of drinking harmful substances coming from the glue, just make sure you let it thoroughly dry before using them (at least a few days). If you glue it well, the contact area between glue and coffee will be negligible anyway.
 |
| a sneaky snail.. I love to give these to guests without telling them about it. Imagine finding this while drinking your coffee? |
 |
| a bird.. |
 |
| And a puppy!! |
And... can you use them?
 |
| taking a bath... |

 |
| blubblub! |
 |
| ahh! There's nothing like a bit of snail-infused coffee in the morning! |

This is one of my favorite crafts to date. I hope you enjoyed it as well!
Kudos to a cute project - hopefully, that will be the last time you stick a glue gun up an elephant's arse. Best line of the post ~
ReplyDeleteAs an aside, I see lots and lots of ceramic figurines in my thrift shop wanderings, I too have wondered "Who buys these things" - your explanation of a Hearty Round of Smash the Ceramic Animals, must be it.
www.thriftshopcommando.blogspot.com
Hahahaha thank you!
DeleteI solemnly swear never to stick a glue gun up an elephant's arse again!
I really hope to be invited to the Smash the ceramic animals game, don't you?
ps: your blog looks lovely!!!